Tuesday, June 15, 2021

AECP Level 3 - "Creative Colouring with Erum"


This was a recent course I just had to take as I am always so inspired by Erum Tasneem's YouTube videos she creates for Altenew which always showcase her incredible talent with watercolouring. I am in awe of her talent and would love to be even half as talented as her one day!

 My final card was great fun as I really wanted to try and improve my watercolouring. The class I took was probably my favourite Altenew Academy class. I learned SO much from Erum. Her watercolouring is absolutely amazing and she teaches so well. I was really inspired to try loose watercolouring this time.

I began by embossing the main floral image from the Altenew Fairy Tale Florals stamp set https://altenew.com/products/fairy-tale-florals-stamp-set using Versamark ink and Rose Gold embossing powder. I used a smooth watercolour paper for this. I taped it to a clipboard using purple tape so that the panel would remain flat when lots of water was applied. 

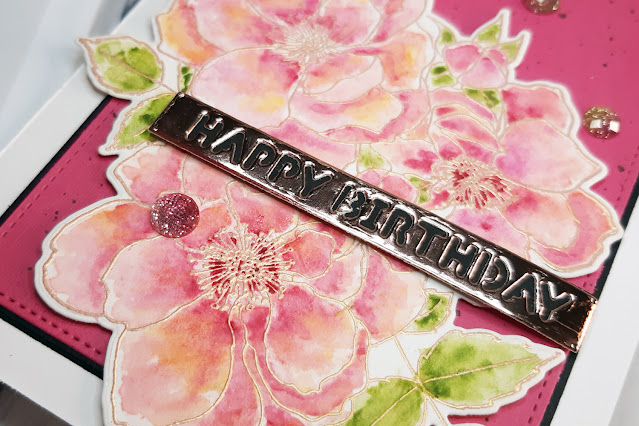
I took my time to start with a very light pink from the 36 pan watercolour pallet https://altenew.com/products/watercolor-36-pan-set and used the wet-on-wet technique taught in one of the tutorials. As the embossing creates a "well" it is easier to control the water and ink as it stays inside each area. I air dried between layers and added darker pinks for shadows and some yellow for a varied look. I did the same for the leaves. I die cut the image out using the coordinating die, added foam tape ready to adhere to the card base. I die cut some pink and black cardstock from my stash to layer up, added some black splatters to the panel and then adhered the floral image to the panel. The sentiment was die cut from rose gold card stock using the Essential Sentiment Die Set https://altenew.com/products/essential-sentiment-strips-die-set with some black cardstock behind the open letters so that the words would be more visible. This was adhered using foam tape and a few glitter gems finished the card. 

This close up photo shows in more detail the embossed outlines and the shading and stippling effect.

   
Thank you for stopping by my blog. 

AECP Level 3 - Fabulous Florals


I just love all flowers so this course was one that caught my eye early on in my AECP journey. The course was presented by Lilith Eeckels and Maryam Perez - two very talented instructors.

For this card I used a slimline size but this time created a vertical card. I cut 2 base panels 4" x 8" and ran one through my die cutting machine using the Organic Linen 3D embossing folder

https://altenew.com/products/organic-linen-3d-embossing-folder and lightly rubbing a foam blender with pale yellow ink over to help define the texture more. The other panel I wanted to be the same colour as the darkest colour in the flowers but I did not have enough cardstock in the correct colour so I made my own by directly rubbing Midnight Violet die ink onto the outer areas of the panel and allowing this to dry for a few minutes. I trimmed off a very thin strip from each side of the textured panel and adhered them together using a wet glue.

TIP: If you are adhering a very textured cardstock it is best to use a liquid glue as it will stick better than a tape runner or double-sided tape.


I die cut 6 sets of flowers and lots of leaves and stems from the Altenew Craft-a-flower Cosmos Die Set https://altenew.com/products/craft-a-flower-cosmos-layering-die-set, layered them together using the very useful layering guide which comes with the set and then arranged them down the panel. I added a sentiment from the Altenew Simple Greetings Die Set https://altenew.com/products/simple-greetings-die-set using black cardstock over vellum. I added some pearls for more interest.


   I hope you like this card as much as I do! I just loved all the die cutting, layering and placement of each flower as the extra space on a slimline size card gives you so much more opportunity to add more flowers!!

AECP Level 3 - Cards in Motion


My card inspired by the class "Cards in Motion" by Ashley Tucker.

It is fun to do something different with a card, just for a change and to make it more interesting for the recipient. I used the Altenew Mini Flower Cluster Die Set https://altenew.com/products/mini-flower-cluster-layering-die-set to die cut 3 flower clusters and 6 sets of leaves, layer them up and adhere as per the layering guide which comes with the set. 


For the pop-up element I cut a piece of scrap cardstock to a rectangle, score it at every 3/4" so that I had 5 sections. I folded and burnished them then adhered the 2 outer sections together to form a hollow square. I adhered this to the join in the inside of the card base. 


For another interactive idea for this card, I decided to make a shaker window on the front panel. I die cut a rectangle from the middle of an A2 panel then ran this through my die cut machine using the new Deck Planks 3D embossing folder https://altenew.com/products/deck-planks-3d-embossing-folder
and inked over the raised parts with some brown ink to create a woodgrain effect. I used the brown as I like brown and teal together. I inked the inside of the shaker with pale pink ink before adding acetate to the open rectangle then adding a double layer of foam tape around the edge to create a "moat" before adding some teal, pink and white sequins from my stash. I added a sentiment embossed with Versafine Onyx Black ink onto vellum and heat set with clear embossing powder. A few matching sequins around the frame finished off the card..

   Here is a look at the inside of the card. I adhered a floral cluster to the square cube which I had made earlier so that when the card is opened the floral cluster stands up. I added the extra leaves for interest and the sentiment from the Mega Label Love stamp set https://altenew.com/products/mega-label-love-stamp-set using teal ink.


And here is a close up of the card.

AECP Level 3 - "Elements of Floral Composition"


The course instructor for "Elements of Floral Composition" was Jaycee Jaspar. Jaycee is a very talented Altenew Certified Educator and in this course he taught how to use Colour, Value, Line, Shape, Form, Texture and Space to design a card which looks very pleasing to the eye. I used a combination of most of these for my card design.


 I was inspired by each of the 7 classes, in particular shape. I learned that using a shape behind a floral image gives the eye a focal place to land. I chose a circle shape but you could use a square, oval, even a diamond or star shape. I recently purchased the Altenew Circular Elements Die Set https://altenew.com/products/circular-elements-die-set to die cut the largest die into some navy cardstock. I adhered this directly to a A2 card panel. 

I wanted some delicate flowers for my focal image and the Altenew Hill Blossoms Layering Stencils https://altenew.com/products/hill-blossoms-layering-stencil-set with matching die was the perfect choice. I used Pink Diamond, Rubellite and Razzleberry die ink for the stencil layers and Forest Glades and Evergreen for the leaves. I inked up 2 sets of flowers to layer up using foam tape to create more dimension. I was inspired by the contrast in colours of pink and navy for this card. I think they work well together.


I adhered the floral image to the left of the circle and added a pink ribbon from my stash. 
The sentiment comes from the Painted Poppy Stamp set, I stamped it using Versamark ink and silver embossing powder. I fussy cut the words and layered them up, nestling them in to the right of the floral image. A few sequins in an odd number which is more pleasing to the eye added the finishing touch.

Here is a close up photo of the finished card. 

Friday, June 11, 2021

AECP Level 3 - Stunningly Styled Stencils

 Hello and welcome back to my blog. I hope you are enjoying following my Altenew Educator Journey with me as much as I have enjoyed it?!

I passed Level 2! Whoohoo! 

For Level 3 I was required to choose 5 more classes which were not part of Level 1 or 2 but which were extras I had enjoyed in my own time. I have taken many classes and have thoroughly enjoyed each one and have learned SO much from each class.

I have created a new post with photos and details of my design process for each card.

"Stunningly Styled Stencils" by Laura Jane and Jenny Colacicco was one of the extra courses I chose to take as I have always loved using stencils in my scrapbooking and card making but especially more recently with the invention of layering stencils which allow you to colour an image using ink with a sponge dauber or blending brushes. This makes for a very quick and easy way to colour and for those who are not too keen on colouring with pencils or watercolours, this is a great alternative for those who are not so keen on actual colouring with coloured pencils or water colours.

For my card,  I decided to use the Altenew Meadow Bush layering stencils and die bundle https://altenew.com/products/meadow-bush-layering-stencil-die-bundle which I have recently purchased and was keen to use. 

I am really enjoying making slimline cards as they provide more "real estate" for a design so I repeated the stencilling to stretch across the card. I chose a colour combo of peaches and oranges from Altenew die inks Sunkissed, Orange Cream and Fire Brick and following the guide for the layering stencils, I stenciled the 3 layers of the flowers and for the final layer I used some Nuvo Moonstone Glimmer Paste through the stencil to add some sparkle and shine and more interest. The paste takes on the colour of the ink underneath which is quite stunning. I set the panel aside to dry for a while. 

I then added the stencilled leaf layer using Forest Glades die ink and adding more ink in places to create some depth and interest. I used gold mirror cardstock to add two thin strips to the 2 long edges and to die cut the sentiment from the Altenew Mega Thanks die https://altenew.com/products/mega-thanks-die
I adhered this to some vellum and fussy cut around it leaving a border which would help to make the sentiment stand out more but still allow the design underneath to be visible but muted. 


I adhered this on a slight angle using foam tape behind the solid cardstock areas.  A few sequins from my stash added the finishing touch and a bit more bling.