Friday, April 23, 2021

AECP Level 2 Card 10 - Masking Unleashed

 Masking is often something that scares people but it is actually really easy. It does require some fussy cutting but the extra effort is so worth it and lucky for me, I love fussy cutting! For my card, I chose to use positive masking techniques and made a mini slimline size card - just for a change!


Using the Altenew Spring Daisy Stamp Set https://altenew.com/products/spring-daisy
I began by using the actual stamps to layer up onto the card panel and help me plan my design.
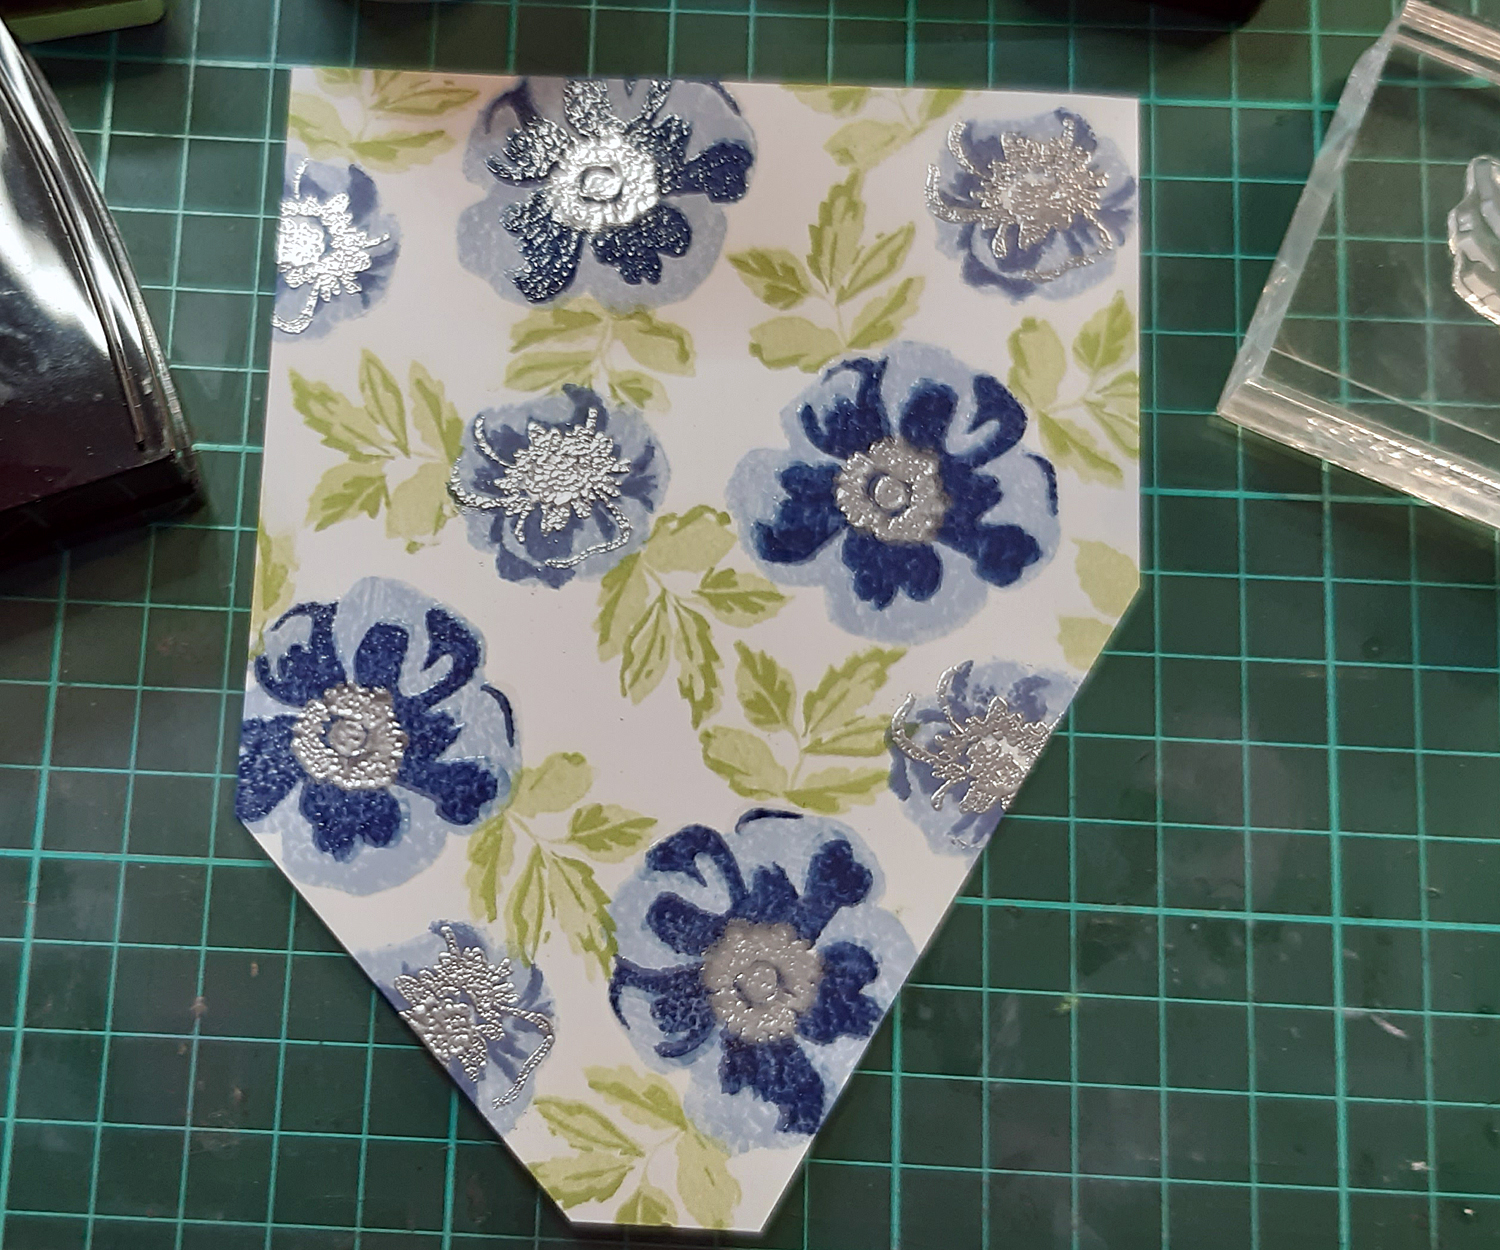
I used some post-it paper to stamp and fussy cut around each image. The idea is to create a new design by using masks to shield some of the subsequent stamping and thereby create a layered look.


TIP: Always stamp the image you want to appear in the foreground FIRST, then use a masked image over that first stamped image. In that way, when the mask is removed, the second image will appear as though it is tucked behind the first image. 
This does require a bit of planning but it is fun and really quite easy to achieve once you get the hang of it! 


I used 2 sizes of flowers and 2 different leaves and if you use a good masking paper, you can keep these masks for future use on other projects. 

I continued to stamp and mask my design until I was happy, then I started to colour my panel.
I decided to use Altenew Crisp Die inks like watercolour paint as they are water-reactive. I created a fun, whimsical, happy rainbow of flowers, once again being careful to add more concentrated colour in areas where the petals join the centre and at the base of leaves. 
I used black ink to splatter on the background and white acrylic pain which I watered down with a little water to splatter over the flowers and leaves.
The sentiment is from Dahlia Blossoms Stamp Set  https://altenew.com/products/dahlia-blossoms
which I stamped using Versafine Onyx Black ink and heat setting it with clear embossing powder. I cut down the card panel by 1/4" on all sides and added a black cardstock panel under this, cutting it 1/8" larger so as to create a black border to frame the image. This was then adhered with foam tape to the card base which measures 6 1/4" x 3 1/3".
Some black enamel dots from my stash scattered around the sentiment completed the card.


This is the last of the 10 card projects for Level 2. I will await the final challenge project and add this to my blog when I am complete!

Roll on Certification!!! :)


AECP Level 2 Card 9 - Magical Alcohol Marker Techniques

 Another great class which inspired me to create a card using bold colours this time. For this card, I chose the Beauty Within Stamp/Die/Stencil bundle set - one of my favourite sets in my collection! 


I began by creating my background using a brayer and some yellow alcohol marker (I have the Nuvo alcohol markers but I'm saving to start collecting the Altenew ones!). I scribbled some colour onto my media mat then used my brayer to collect the ink and transfer it onto the cardstock. I loved the organic look it created. 


Next, I stamped my images onto Ninah Solar White 80 lb cardstock using just the outline layers.
I proceeded to use my alcohol markers to colour and shade each flower and leaf cluser, paying attention to shading to give the images a more realistic look. I splattered some black alcohol ink over this (not shown in photos)

I then die cut each image using the matching dies.

I wanted to make the background more interesting so I cut about 1 inch off the right side of the background panel and used the Altenew Creative Scalloped Edges Dies
https://altenew.com/products/creative-edges-scalloped-scallops-die-set to die cut a fancy border. I used a strip of matching blue cardstock from my scraps drawer to add to the right side and bring in another area of the pretty blue colour. This was then adhered to the card base. The sentiment was cut from the Altenew Essential Sentment Strips Die https://altenew.com/products/essential-sentiment-strips-die-set
a small scrap of the same blue cardstock was adhered behind the die cut to help the words pop. Some gold metallic thread from Altenew https://altenew.com/products/metallic-thread-set was attached behind the foam tape before adhering it to the card. 
I used an orange alcohol marker to colour some pearl embellishments orange and adhered these to the centres of the flowers for added interest and dimension.

I love how this card turned out!


AECP Level 2 Card 8 - Impressive Heat Embossing

 Heat embossing is what started me on my card-making journey when I was just a teenager and when only a few colours of embossing powder were available and all stamps were only made using wooden blocks!!

This class was such fun! I decided to make the most of the heat embossing technique and chose class 4 as my inspiration - layered heat embossing.


To begin, I used the the Altenew Ribbon Waves 3D Embossing Folder to emboss a black piece of 80 lb cardstock. 
I then lightly dragged my Versamark clear embossing ink pad over just the raised areas of the embossed image and then applied Iridescent embossing powder and heat set it. This helped to accentuate the background pattern but still keep it subtle.


For the flowers, I used the Altenew Dahlia Blossoms Stamp and Die Bundle
https://altenew.com/products/dahlia-blossoms-stamp-die-bundle . Each layer was stamped with Versamark embossing ink and I used a few different embossing powders for each other layer:

Flowers - bottom layer - Ranger Cotton Candy Speckle EP
              - detailed layer - Lawn Fawn Rose Gold EP
Leaves - bottom layer - Ranger Mint Chip Speckle EP
            - detailed layer - Nuvo Fine Detail Copper Blush EP
The floral elements were cut using the co-coordinating dies and then arranged in a triangular arrangement using foam tape to add dimension. 
The sentiment was stamped onto Lawn Fawn Pearlescent Vellum using Versafine Onyx Black ink and clear embossing powder.
Some clear water bubble embellishments completed the card.

Here is a close up of the finished card.


AECP Level 2 Card 7 - Colour Your Day

 My inspiration for this class came from video 5 and gave me another opportunity to practice my water colouring! 


I chose to use an image from Altenew Precious Peony stamp set 

I began by stamping the image using Versafine Onyx Black ink and applying clear embossing powder over it and heat setting. This forms a "well" in each area of the image which helps to contain any water laid down. 
I used my Altenew crisp die inks as a watercolour as they are water-reactive so make a great medium to water colour with - a great way to stretch your supplies!

I was careful to think about where natural shading would be required, mostly places under each petal or where the petals join the centre of the flower. I used the wet-on-wet technique, applying a small amount of plain water to one section at a time, dropping in pigment and allowing the ink to naturally bloom and create a gradient of colour. I found this so relaxing and really enjoyed the whole process.
I added a light grey wash of colour to the background and when that was dry, I splattered some black ink randomly, but covered the floral image with my hand. I love splattering and I think it creates a more artsy look.
The sentiment was cut from the Altenew Essential Sentiment Strips Die Set
https://altenew.com/products/essential-sentiment-strips-die-set using matt gold cardstock from my stash with a layer of black cardstock under the die cut to help the words pop. These were adhered using foam tape. To add more cohesiveness to the card, I added a layer of the same gold card stock under the image to create a frame before adhering it to the card base. A few yellow gems from my bling collection added the finishing touch. 

Here is a close up image of the finished card.


Sunday, April 18, 2021

AECP Level 2 Card 6 - Beautiful Details

I really enjoyed all the ideas, tips and tricks in this class. The take home message was that attention to detail is really important in order to take a card from great to fabulous. A big focus was on using coloured pencils which I have enjoyed since childhood. I got the chance to add some great details to my card.

I have been loving all the new Altenew layering stencils. They are such fun and the results are always great. I used the Flower Bunch Simple Layering Stencils for this card.                                                    https://altenew.com/products/flower-bunch-simple-layering-stencil-set-4-in-1 . I loved the result after using all 4 layers but to step it up a notch, I used some simple colouring pencils I've had in my stash for years and proceeded to add extra colouring layers, shading and more definition to the floral image. 

This is a close up of the completed stencilled image without any extra shading.

WOW! Just look at the difference after using coloured pencils! I was really amazed.


I decided to add even more interest to the card by fussy cutting around the right side of the floral image and then straight up and down from the image. I trimmed 1/2" off the left side then attached this cut out to the card base using foam tape. It enhance the peach coloured flowers, I used some rose gold matt metallic cardstock from my stash, cut into 1/8" strips and adhered there on either side of the image. The sentiment was chosen from Altenew Handpicked Bouquet 
https://altenew.com/products/handpicked-bouquet-stamp-set, stamped with Versafine Onyx Black ink onto the same rose gold cardstock then heat embossed with clear embossing powder. I cut the right side into a fish tail banner and adhered with foam tape for extra dimension. I added some peach sequins for more interest and shine. 


AECP Level 2 Card 5 - Polychromatic

 Polychromatic means "multiple colours" which excited me as I love colourful images.

I decided to change the size of my card for this card and made a slimline card. Slimline cards are all the rage currently and I have made a few and have found them a pleasant change from the usual A2 size. As there is more "real estate" on the card front to decorate, this lends itself to being even more creative! 


This card measures 8 1/2" x 3 1/2". I began by stamping the large floral image from the new Fairy Tale Florals stamp set https://altenew.com/products/fairy-tale-florals-stamp-set . The main floral stamp is really large and I was able to stamp it on the left side, turn it around and stamp it again on the right side to create a continuous floral image. 

I used alcohol markers to colour the images in 3 complimentary colours. I blended each flower and the leaves using 3 shades of the same colour. I find colouring very relaxing. 

My chosen technique from this class was the Eclipse technique where you die cut an image or word from the patterned panel then add them back with extra dimension behind the letters/image to create more interest but to still keep the whole pattern complete. I used the solid alphabet dies from the Linea Pathway Solid and Outline die set                                                                    https://altenew.com/products/linear-pathway-alpha-solid-and-outline-die-bundle and because I was making a slimline card, I was able to easily fit in the word Birthday. 


I used my T-ruler to help me space out the letters and make sure that they were lined up in a straight line. When I was happy with the placement, I added a long piece of purple tape across all the letters to keep them in place, then ran the panel through my die cutting machine. I made sure I kept the landlocked pieces from the B, R, D and A letters. I used a black fineliner marker to add a border around the card.


From black fun foam I die cut the same letters and adhered them into the holes on the card base. I then adhered the die cut floral letter back into their correct positions, including the land-locked pieces.

From black cardstock I heat embossed the word "happy" using fine detail white embossing powder, trimmed it and adhered it above the eclipse word with foam tape. I added some iridescent sequins around the card for some bling. 


AECP Level 2 Card 4 - Creative Watercolour Media

 I have always loved the look of watercolour and although I am very new to this technique, this class offered my some wonderful tips and tricks and gave me another chance to practice. 


Using the Altenew Precious Peony stamp set https://altenew.com/products/precious-peony-stamp-set I stamped 2 of the images onto a A2 panel of Ninah Solar white 80 lb cardstock using Versafine Onyx Black ink and then embossing these images with clear embossing powder. 

I used Altenew crisp die inks in colours Rose Quartz, Cosmic Berry, Purple Wine, Forest Glades and Evergreen which are water-reactive inks so work really well for watercolouring too! I took my time and started with wetting one petal at a time with plain water using a small paintbrush and then dropping small amounts of the lightest pink into that area and covering the whole petal. I repeated this for each area. When that layer was dry I added darker shades to give more depth and accent the areas where there would naturally be more shadows, like the under side of each petal. 

When the flowers and leaves are painted and dry I used a very watered-down was of limestone ink over the whole background.  I felt that a light grey wash would contrast nicely with the bright pink flowers.

I added some black ink splatters, cut the panel down by 1/8" on each side and adhered this to a silver cardstock panel A2 size. This was then stuck to a card base the same size. 

For the sentiment, I used 2 sentiments from the Delicate Bouquet stamp set https://altenew.com/products/delicate-bouquet-stamp-set. I used some black cardstock from my stash and after using my anti-static powder bag on the cardstock, I used Versamark sticky embossing ink to stamp the words then heat embossed them using silver embossing powder. The sentiments were adhered with foam tape to add more dimension to the card. A few silver gems scattered around the sentiment finished the card off nicely. 

TIP: Always use an anti-static powder bag or even a light dusting of cornstarch or baby powder before heat embossing anything so that the embossing powder only sticks to the places were embossing ink has been laid down.


Here is a close up photo of the finished card. I know I need lots of practice with water colouring but as with anything in life, practice makes perfect 😍


AECP Level 2 Card 3 - With a Twist

 I really enjoyed this class by Therese Calvird which focused on changing things up a bit and creating cards which are a little different to the normal!  I was inspired by lesson 4 which demonstrated how to cut your card panel into a different shape, rather than keeping it square.


I used the Altenew Flower Arrangement stamp set for this project. On a 80 lb A2 Ninah Solar White panel I randomly stamped the first 2 layers of the flowers using Altenew crisp die ink in Polar Bear, Winter Lake and Arctic Mountain. For the 3rd detailed layers and the flower centres, I heat embossed these using Versamark embossing ink and silver embossing powder, just for some added interest and a little shine! The leaves were stamped using Altenew Frayed Leaf and Forest Glades inks. 


For the "with a twist" idea, I cut the panel down on each bottom corner at a different angle and then mounted this onto a navy blue piece of cardstock from my stash. The sentiment was stamped and embossed using the same silver embossing powder and popped up with foam tape for added dimension. A few silver gems added a little more bling. I was very happy with how this card turned out. 

TIP: When stamping a random pattern always start slightly off-centre and continue stamping so that some images are stamped off the page. This gives a more pleasing result and appears as if you have cut your card base from a larger page. 

Here is a close up photo of the finished card.


AECP Level 2 Card 2 - In the Mood for Colour

In this course, I learned that the colours we choose often reflect a certain mood. I decided to create a card using a classing rose in the colour red. Red symbolises love, passion and energy so I decided to use the Altenew Kind Reminders stamp set  https://altenew.com/products/kind-reminders-stamp-set. I also decided to use alcohol markers to colour my image, concentrating on my shading and depth of colour. 

To enhance the classic vintage feel of this card, I used the Altenew Storybook Frame 3D embossing folder https://altenew.com/products/storybook-frame-3d-embossing-folder which creates gorgeous texture. I gently rubbed a gold mini ink cube from my stash over the raised portions to further enhance the design and also allowed small amounts of gold ink to brush over the flat areas and the edges of the card panel to make the card look a little old and vintage. I fussy cut the coloured rose, popped it up on foam tape for extra dimension and bend the leaves a little to give more movement. For the sentiment, I used some rose gold cardstock from my stash, stamped the sentiment in Versafine Onxy Black ink and embossed this will clear embossing powder. I cut a fish tail for extra interest. For the finishing touch I added some small dots of Nuvo gold drops and allowed them to thoroughly dry. 

Tip: when stamping on a slick surface such as metallic cardstock or acetate, be very careful not to let your image move after stamping - use a stamp positioning tool if possible. The ink is very likely to smear so in order to prevent that happening I heat embossed the words. 

Below are a few close up photos. I used clear Wink of Stella on the rose for added shimmer.


AECP Level 2 Card 1 - Beyond Basic Backgrounds

 Welcome back to my blog! I passed Level 1 of the Altenew Educators Certification Program and I'm ready to share with you another 10 cards which I have made for Level 2. Some techniques I have tried before but some were new to me but I have found this to be the most fantastic way to stretch my creativity and push me beyond my comfort zone! There will be 10 separate blog posts for each technique. I hope you enjoy each post and find some inspiration from my work.

For this first card, I chose to create a rainbow background using 6 Distress Oxide inks blended onto 80 lb Ninah Solar White cardstock. I then used the Water Bleaching technique to create the design.


The colours I used were Kitsch Flamingo, Spiced Marmalade, Squeezed Lemonade, Twisted Citron, Tumbled Glass and Wild Lilac. I used an ink blending brush to apply a soft layer of colour an making sure that I went back over an area twice to intensify the colour and then to blend two adjacent colours together to form a smooth transition and soft blend. 


When I was happy with this blend I decided to use the Altenew Statement Flowers stamp set https://altenew.com/products/statement-flowers-stamp-set because it is a large floral outline design with lots of open spaces which would allow the background colours to still show up well. 
The technique is similar to the Alcohol Lift Technique but this uses plain water instead. I used my Mini Misti Stamping Tool so that I could stamp the image multiple times until I was happy with the intensity of the image. Also, because I used water-reactive inks for this technique, the water spritzed onto the stamp is then transferred to the background and "lifts" off some of the ink. The image is initially not very visible but with repeated stamping it slowly emerges as a sort of ghost image. 
This is a great way to quickly colour flowers if you are not too keen on using other colouring mediums to colour in an image. 
I trimmed 1/8" off the A2 panel on all sides and matted it onto a black layer to help define and frame the whole image. I stamped the sentiment from the same stamp set using Versafine Onyx Black ink and then applied clear embossing powder and heat set the sentiment. A few black enamel dots added the finishing touches and tied in with the black border. 
Here is a close up of the card.